지금껏 나는 Robot을 구동 시키기 위해 KAIST Hubolab에서 자체 개발한 PODO[1]–[3]라는 Robot operating system을 사용하였다. PODO는 DARPA Robotics Challenge에 출전하며 팀원과의 원활한 협업을 목적으로 탄생한 C++기반 프로그램이다. 구조적으로 ROS와 비슷한 점들이 많으며 real-time system으로 구축 가능하다.
이번에 만들고 있는 새로운 Robot CYBO는 PODO가 아니라 MATLAB Simulink Real-Time을 사용해보기로 하였다. 익숙했던 기존 로봇의 시스템을 뒤엎는 다는 큰 결심을 하고 Simulink Real-Time License를 구입하였다. 앞으로 어떤 난관이 있을지… 부디 장벽을 잘 돌파하고 성공적으로 시스템 구축할 수 있기를 바란다.
1. Simulink Real-Time
A. Before Start
Simulink Real-Time은 Robot operating program을 development할 development PC(MATLAB이 설치가능한 일반적인 Desktop이나 Laptop으로 구축 가능)와 Simulink Real-time OS로 부팅하여 real-time 으로 Robot을 구동할 Target PC가 필요하다.
B. Cheap, Powerful, Lightweight Target PC Selection
Mathworks는 SpeedGoat hardware를 이용하여 Target PC를 구축하길 강력하게 추천하고 있지만! 가격이 비싸고 무게가 무겁다(for legged robot)는 문제가 있다.
다음은 Mathworks에서 official하게 제공하는 Target PC requirement이다.
Target PC requirement
https://mathworks.com/help/releases/R2017b/xpc/gs/target-computer-hardware.html#bu2qpln-1
Target PC Bios Setting
https://mathworks.com/help/releases/R2017b/xpc/gs/bios-settings.html
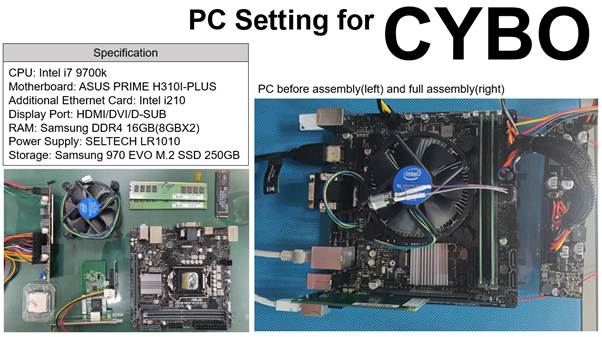
하지만 조건을 만족하는 embedded PC(smaller than mini-iTX formfactor)를 Target PC로 만드는 것을 시도하였다. 여러 시도 끝에 PC 1개(i5 4th generation) 성공, 2개(i7 6th generation)는 실패하였다. 결국 computing power와 유지 보수가 쉬운 mini-iTX formfactor로 target PC를 Setting하였다.
Specification of Development PC(My Laptop Lenovo E480)
- Intel i7 8550U
Specification of Target PC
- CPU: Intel i7 9700k
- Motherboard: ASUS PRIME H310I-PLUS
- Additional Ethernet Card: Intel i210
- Display Port: HDMI/DVI/D-SUB
- RAM: Samsung DDR4 16GB(8GBX2)
- Power Supply: SELTECH LR1010
- Storage: Samsung 970 EVO M.2 SSD 250GB
2. Simulink Real-Time 설치
2.1. Development PC Program Setup
a. MATLAB 설치(R2016a이상 설치, R2019b 추천)
- https://kr.mathworks.com/downloads/web_downloads/select_release?mode=gwylf
b. MATLAB, Simulink Real-Time 설치
c. Visual Studio 설치(2017 or 2019, 2017이 지원하는 범위가 더 넓기 때문에 2017 추천)
- https://visualstudio.microsoft.com/ko/
- 워크로드 -> C++를 사용한 Desktop 개발 체크
d. MATLAB Support for MinGW-w64 C/C++ Compiler 설치
- https://mathworks.com/matlabcentral/fileexchange/52848-matlab-support-for-mingw-w64-c-c-compiler
e. MATLAB실행 후 mex -setup
f. Microsoft Visual C++ 201X (C) 클릭
2.2. Target PC Setting
a. Activate PXE Boot option at Bios setting. (Only for Lan Boot)
b. Activate USB Boot option at Bios setting. (Only for USB Boot)
2.3. Development Computer Setting (Only for Lan Boot)
a. Developement Computer의 해당 LAN 포트의 ip주소와 서브넷 마스크를 설정하고 기억하라. (여기선 192.168.7.4 & 255.255.255.0) 게이트웨이는 비워도 된다.

b. Development Computer에서 MATLAB을 실행하고 slrtexplr 를 명령창에 입력하면 Simulink Real-Time Rxplorer 창이 나타난다.
c. Add Target을 눌러 Target을 만들고 해당 Target의 Properties에 들어가라.
d. Host-to-Target communication 에서 Target Computer의 ip를 설정해주자. 임의로 설정하되 Developement Computer의 ip 주소와 8 LSB 비트만 달라야한다. (즉, 192.168.7.xxx 의 형식으로 설정) 서브넷 마스크는 Developement Computer와 일치하도록 설정하며, 게이트웨이의 경우Developement Computer의 게이트웨이가 따로 설정되지 않았다면 255.255.255.255로 설정하여라.
e. Target Drive는 auto, Bus type 은 PCI 로 설정하여라.
f. Target Setting 에서는 USB Support, Multicore CPU, Graphics mode 를 체크하여라. (USB Support를 할 경우 안될 때가 있는데 그럴때는 체크해제 하도록, 원인은 모르겠음.) Memory settings 에서는 RAM size auto 로 체크.
g. Boot Configuration 에서는 Boot mode를 Network로 설정.
h. Target Computer를 실행하여라. 성공적으로 실행됐다면 Developement Computer에 어떤 창이 뜰 것이고, 해당 Target을 선택하고 OK를 눌러라. MAC address가 자동으로 입력되고 기다리면 Simulink Real time 이 Target Computer에서 실행된다.
i. Simulink Real-Time Explorer에서 해당 Target을 Connect
j. slrttest를 입력하여 connect가 잘 되었는지 test한다. 다음은 connection이 있을 때 참고할 수 있는 link이다.
https://mathworks.com/help/xpc/troubleshooting-in-xpc-target.html
'Cybo Development > Planner' 카테고리의 다른 글
| 20200105 Simulink Real-Time Connection 2 (0) | 2020.01.06 |
|---|---|
| 20200103 Elmo Gold Solo Double Twitter Installation 2 (0) | 2020.01.05 |
| 20200101 Elmo Gold Solo Double Twitter Installation 1 (0) | 2020.01.02 |
| Plan20181231 & Elmo Gold Solo Double Twitter (0) | 2019.12.31 |